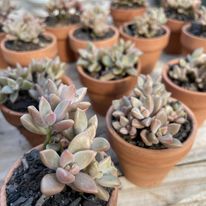
Propagation Methods
Propagation and succulents go hand-in-hand. There are several ways to propagate your succulents; however, stem cuttings and leaf cuttings are the usually easiest method. Experienced horticulturist may instead opt for propagation through seed because of the added benefits, such as the potential for genetic mutation, or the ability to create hybrids, but this method can be incredibly difficult. Luckily if you follow these propagation guides then even the most difficult of methods will become easy.
Leaf Cutting Propagation
Surprisingly this method of propagation does not require any cutting. Simply twist off a leaf, place in a shaded location, lay it face up on a shallow tray of soil, and watch as a new plant sprouts. Avoid watering until the leaf has dried up, as this will cause it to rot. The new plant will receive water and nutrients from the mother leaf until it has dried up completely.
Stem Cutting Propagation
For propagation via stem cutting, you will cut the stem just below the head, using a sterile tool. Gently twist off the bottom sets of leaves, as this will create room for the stem to fit securely into the soil. Let the cutting dry for 24 hours in a shaded location before planting, then water thoroughly. Keep the cutting in partial shade until it has firmly rooted. You can check if it has rooted by gently tugging on the stem. If there is resistance when trying to pull it out of the soil, then it has successfully rooted.
Pup/Offshoot Propagation
Some succulents can grow pups or offshoots from their roots and stems. These baby succulents, once having reached maturity, can be separated from their mother plants and rooted to grow on their own. You can tell that the babies have reached maturity once they are roughly 1/4 the size of the mother plant, although this varies depending on the genus and species. To separate them simply twist or cut them off from the mother plants and from here you can root them just as you do stem cuttings. It is important to note that some pups or offshoots may root on their own while still attached to the mother plant.
Seed Propagation
Introduction to the Method
Before attempting this method, you should ask “why attempt something so difficult when much easier options are available?” The main benefit of propagating from seed is the potential for genetic mutations to occur. Propagating via stem and leaf cutting create what are essentially clones, as the offspring will always be genetically identical to the mother plant. Propagating from seed allows for genetic mutations which can lead to very unique and potentially never before seen traits. Another great reason why you might want to learn this method is because of the ability to create hybrids. Overall, this method is extremely rewarding.
Pre-Pollination Process
For propagation via seed, you will need to first ensure that your parent plants have sufficient genetic diversity. Ensuring that your parent plants are compatible for seed production can be a tedious task. You might never be entirely sure of their compatibility until you try to pollinate them. There is some good news, because the simplest way to tell if your plants are compatible, is as easy as knowing where they came from. If you have purchased your plants in separate containers, or had them gifted from separate individuals, then the chances are in your favor that they will have enough genetic diversity to produce viable seed.
Pollination Process
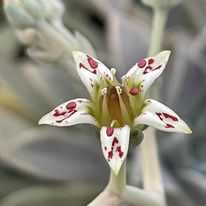
Seed propagation starts with pollination, so here is a tip to increase the chances of yours being successful. You should use the self-pollination method. Using a cotton swab, gently collect the pollen from the stamens of one flower and brush it onto the stigma of any flower on the other plant. In this image you can see the flower of a Graptopetalum paraguayense. The stems with fuzz at the end are the stamens, while the stems with red bumps at the end are the stigma.
Seeding Process
Now that you have a successful pollination, the next step is to wait for the flower to dry and for the seed pod to mature. The seed pod is the bulbus part at the bottom of the flower. After a successful pollination, the flower will close and start growing seed. Once you see a dried shell in place of the flower you can gently cut it off, peel it open, and store the seeds in a dry container, or sow directly into a well-draining seed starting mix. Keep the soil consistently moist, but not wet, until the seedlings have grown 2″-3″ in height. After the seedlings have grown a few inches, you can water less frequently and more thoroughly.
Links
If you are attempting to breed a hybrid succulent, then the pollination process is a little trickier. Click here to visit our article on Hybrid Succulents and learn more.


Pingback: Graptopetalum – a Succulent Genus - Gen1 Greenhouse